
Setting up a Progressive Web App (PWA) is dead simple with Vue.js, and especially since Vue CLI v3. However implementing push notifications can be pretty tricky.
Vue.js is going to be used for the frontend side, Python/Django and Django Rest Framework for the backend, and Google Firebase Messaging as the messaging intermediary. The latter is necessary as it will be the third party in charge of pushing the notifications to the device. I know it’s pretty disappointing being forced to use such an additional layer in our stack but there is no other choice. Of course there are alternatives to Firebase, like Pusher for example.
Firebase will have to be integrated into several parts of your code:
- in the frontend for the browser to listen to Firebase for new notifications
- in the frontend again on the page where you want to ask the user for his permission to enable notifications and, if he agrees, get a notification token from Firebase and send it to the backend to store it in DB. If a user uses several browsers (e.g. Chromium mobile on his smartphone, and Firefox desktop on his PC), several tokens will be associated with him in DB, and notifications will be received in several locations at the same time.
- in the backend to receive the notification token from frontend and store it in DB
- in the backend to send push notifications to a user by sending a message to the Firebase API. Firebase will take care of retrieving your message and routing it to the right associated browser.
Please keep in mind that the PWA standard is still evolving and not yet equally implemented in all browsers/platforms. For example push notifications are not yet implemented on iOS as of this writing!
Vue.js PWA
Install the Vue.js CLI thanks to the following npm command (install NPM first if needed):
npm i -g @vue/cli
Create a new PWA project:
vue create <My Project Name>
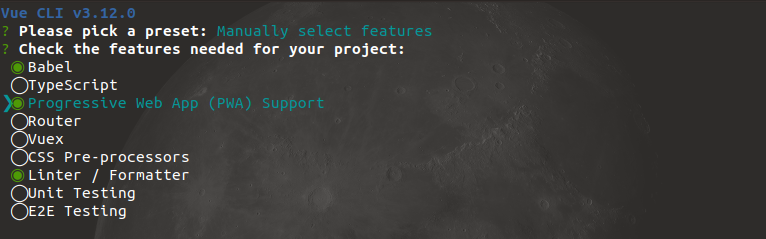
Select the “Manually select features” option and then select “Progressive Web App (PWA) support”:
Select all the other options you need and wait for Vue CLI to create the project. Please notice that Vue CLI automatically creates a registerServiceWorker.js in the src directory and imports it at the top of your main.js. This file will take care of creating a service-worker.js at the root of your website during production build. The latter is needed in order for the browser to detect your website as a PWA.
In your public directory create a manifest.json file which will describe your PWA: the name of your app, app icons for various screen sizes, colors… Important things are the start_url which is the URL to open by default when launching the PWA on your smartphone, and gcm_sender_id which is the ID that all web apps using Firebase should use (don’t change it then). You can specify much more information in this file, just have a look at the docs. You can also use this helper if you like. It should look like the following:
{
  "name": "My App Name",
  "short_name": "My App Short Name",
  "icons": [{
      "src": "./img/icons/android-chrome-192x192.png",
      "sizes": "192x192",
      "type": "image/png"
    },
    {
      "src": "./img/icons/android-chrome-512x512.png",
      "sizes": "512x512",
      "type": "image/png"
    },
    {
      "src": "./img/icons/apple-touch-icon-60x60.png",
      "sizes": "60x60",
      "type": "image/png"
    },
    {
      "src": "./img/icons/apple-touch-icon-76x76.png",
      "sizes": "76x76",
      "type": "image/png"
    },
    {
      "src": "./img/icons/apple-touch-icon-120x120.png",
      "sizes": "120x120",
      "type": "image/png"
    },
    {
      "src": "./img/icons/apple-touch-icon-152x152.png",
      "sizes": "152x152",
      "type": "image/png"
    },
    {
      "src": "./img/icons/apple-touch-icon-180x180.png",
      "sizes": "180x180",
      "type": "image/png"
    },
    {
      "src": "./img/icons/apple-touch-icon.png",
      "sizes": "180x180",
      "type": "image/png"
    },
    {
      "src": "./img/icons/favicon-16x16.png",
      "sizes": "16x16",
      "type": "image/png"
    },
    {
      "src": "./img/icons/favicon-32x32.png",
      "sizes": "32x32",
      "type": "image/png"
    },
    {
      "src": "./img/icons/msapplication-icon-144x144.png",
      "sizes": "144x144",
      "type": "image/png"
    },
    {
      "src": "./img/icons/mstile-150x150.png",
      "sizes": "150x150",
      "type": "image/png"
    }
  ],
  "start_url": ".",
  "display": "standalone",
  "background_color": "#000000",
  "theme_color": "#210499",
  "gcm_sender_id": "103953800507"
}
Please note that your site should be HTTPS in order for the browser to read the manifest.json and behave like a PWA.
If everything goes fine, the PWA should now be easily installable on your smartphone. Visit your website with a modern mobile browser like Chrome. If the browser detects the manifest.json it should automatically propose you to install this PWA as a phone application (still not supported by all the browsers as of this writing).
Firebase Set Up
In order for your PWA to support push notifications, you should pair with an external service like Firebase Cloud Messaging (FCM). Please note that FCM is a subset of Firebase but you don’t need any of the other Firebase features (like DB, hosting…).
So please create a Firebase account, go to your Firebase console, create a project for your website, and retrieve the following information from your project settings (careful, there are multiple tabs to open, and this is not obvious to get all the information at once):
- Project ID
- Web API Key
- Messaging Sender ID
- Server Key
- create a web push certificate and then retrieve the Public Vapid Key generated
Django Backend
I’m assuming that you’re using Django Rest Framework here.
In Django, use the FCM Django third party app to make your FCM integration easier (this app will take care of automatically saving and deleting notification tokens in DB, and will provide you with a helper to easily send notifications to FCM).
Install the app with pip install fcm-django, add it to your Django apps, and set it up (feel free to adapt the below settings, the only required one is FCM_SERVER_KEY for FCM authentication):
INSTALLED_APPS = (
        ...
        "fcm_django"
)

FCM_DJANGO_SETTINGS = {
        # authentication to Firebase
        "FCM_SERVER_KEY": "<Server Key>",
        # true if you want to have only one active device per registered user at a time
        # default: False
        "ONE_DEVICE_PER_USER": False,
        # devices to which notifications cannot be sent,
        # are deleted upon receiving error response from FCM
        # default: False
        "DELETE_INACTIVE_DEVICES": True,
}
Add a route in urls.py to the FCM Django endpoint that will take care of receiving the notification token and store it in DB:
from fcm_django.api.rest_framework import FCMDeviceAuthorizedViewSet

urlpatterns = [
  path('register-notif-token/',
    FCMDeviceAuthorizedViewSet.as_view({'post': 'create'}), name='create_fcm_device'),
]
Now whenever you want to send a push notification to a user do the following (likely to be in your views.py):
from fcm_django.models import FCMDevice

user = <Retrieve the user>
fcm_devices = FCMDevice.objects.filter(user=user)
fcm_devices.send_message(
  title="<My Title>", body="<My Body>", time_to_live=604800,
  click_action="<URL of the page that opens when clicking the notification>")
It’s up to you to adapt the query on the database to define precisely whom you want to send push notifs to. Here I’m sending push notifs to all the browsers of a user, but I could also decide to send notifs to a specific browser (called “device” in the FCM Django terminology).
There are more parameters available in the send_message method, feel free to have a look at the docs but also at the docs of the underlying Python project this library is based on.
Setting up the time_to_live was necessary in my case: Firebase say there is a default time to live set but it appeared there wasn’t when I tested it (bug?) so when notifications were sent while the user device was turned off, he never received it again when turning on the device.
Implementing Push Notifications in Vue.js
Create a firebase-messaging-sw.js file in your public directory and put the following inside:
importScripts('https://www.gstatic.com/firebasejs/5.5.6/firebase-app.js');
importScripts('https://www.gstatic.com/firebasejs/5.5.6/firebase-messaging.js');

var config = {
    apiKey: "<Web API Key>",
    authDomain: "<Project ID>.firebaseapp.com",
    databaseURL: "https://<Project ID>.firebaseio.com",
    projectId: "<Project ID>",
    storageBucket: "<Project ID>.appspot.com",
    messagingSenderId: "<Messenging Sender ID>"
};

firebase.initializeApp(config);

const messaging = firebase.messaging();
You now have a valid service worker which will poll Firebase in the background listening to new incoming push notifications.
It’s time now to ask the user for his permission to send him notifications and, if he agrees, get a notification token from FCM and store it in the backend DB. Your backend will use this token to send push notifications through FCM. It’s up to you to decide on which page of your app you want to do ask the user permission. For example you could implement this on the home page of your application once the user is logged in. You could do something like this:
import firebase from 'firebase/app'
import 'firebase/app'
import 'firebase/messaging'

export default {
  methods: {
    saveNotificationToken(token) {
      const registerNotifTokenURL = '/register-notif-token/'
      const payload = {
        registration_id: token,
        type: 'web'
      }
      axios.post(registerNotifTokenURL, payload)
        .then((response) => {
          console.log('Successfully saved notification token!')
          console.log(response.data)
        })
        .catch((error) => {
          console.log('Error: could not save notification token')
          if (error.response) {
            console.log(error.response.status)
            // Most of the time a "this field must be unique" error will be returned,
            // meaning that the token already exists in db, which is good.
            if (error.response.data.registration_id) {
              for (let err of error.response.data.registration_id) {
                console.log(err)
              }
            } else {
              console.log('No reason returned by backend')
            }
            // If the request could not be sent because of a network error for example
          } else if (error.request) {
            console.log('A network error occurred.')
            // For any other kind of error
          } else {
            console.log(error.message)
          }
        })
      },
    },
  mounted() {
    var config = {
      apiKey: "<Web API Key>",
      authDomain: "<Project ID>.firebaseapp.com",
      databaseURL: "https://<Project ID>.firebaseio.com",
      projectId: "<Project ID>",
      storageBucket: "<Project ID>.appspot.com",
      messagingSenderId: "<Messenging Sender ID>"
    }
    firebase.initializeApp(config)

    const messaging = firebase.messaging()

    messaging.usePublicVapidKey("<Public Vapid Key>")

    messaging.requestPermission().then(() => {
      console.log('Notification permission granted.')
      messaging.getToken().then((token) => {
        console.log('New token created: ', token)
        this.saveNotificationToken(token)
      })
    }).catch((err) => {
      console.log('Unable to get permission to notify.', err)
    })

    messaging.onTokenRefresh(function () {
      messaging.getToken().then(function (newToken) {
        console.log('Token refreshed: ', newToken)
        this.saveNotificationToken(newToken)
      }).catch(function (err) {
        console.log('Unable to retrieve refreshed token ', err)
      })
    })
  }
}
Conclusion
Setting up push notifications within a PWA is definitely NOT straightforward! Many parts of your application should be involved and you need to understand how the third party you chose (here Firebase) is working.
Please keep in mind that PWAs are still pretty new and supported features are constantly evolving. More importantly, don’t base critical information on push notifications only as it’s less reliable than other systems like SMS or emails…
Also, don’t forget to use push notifications carefully as notification flooding can be very annoying!
I hope you liked this how-to. Please don’t hesitate to send me a feedback or add some ideas in the comments!