

Where Should Tech Workers Relocate? 64 Hubs, Jobs vs. Visa Difficulty

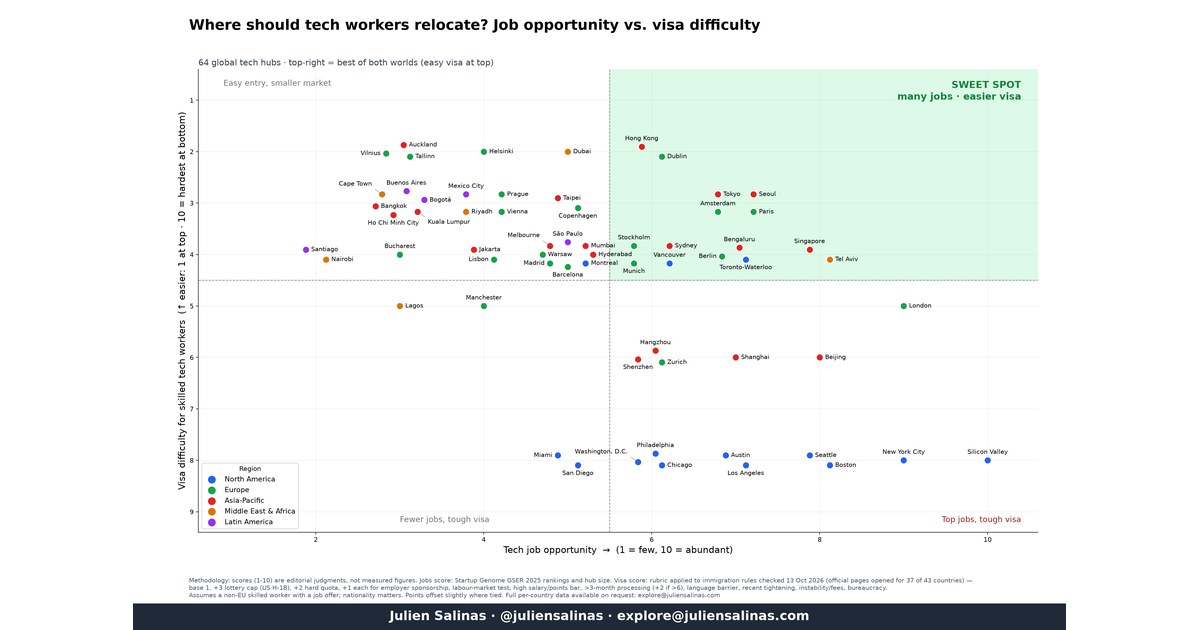
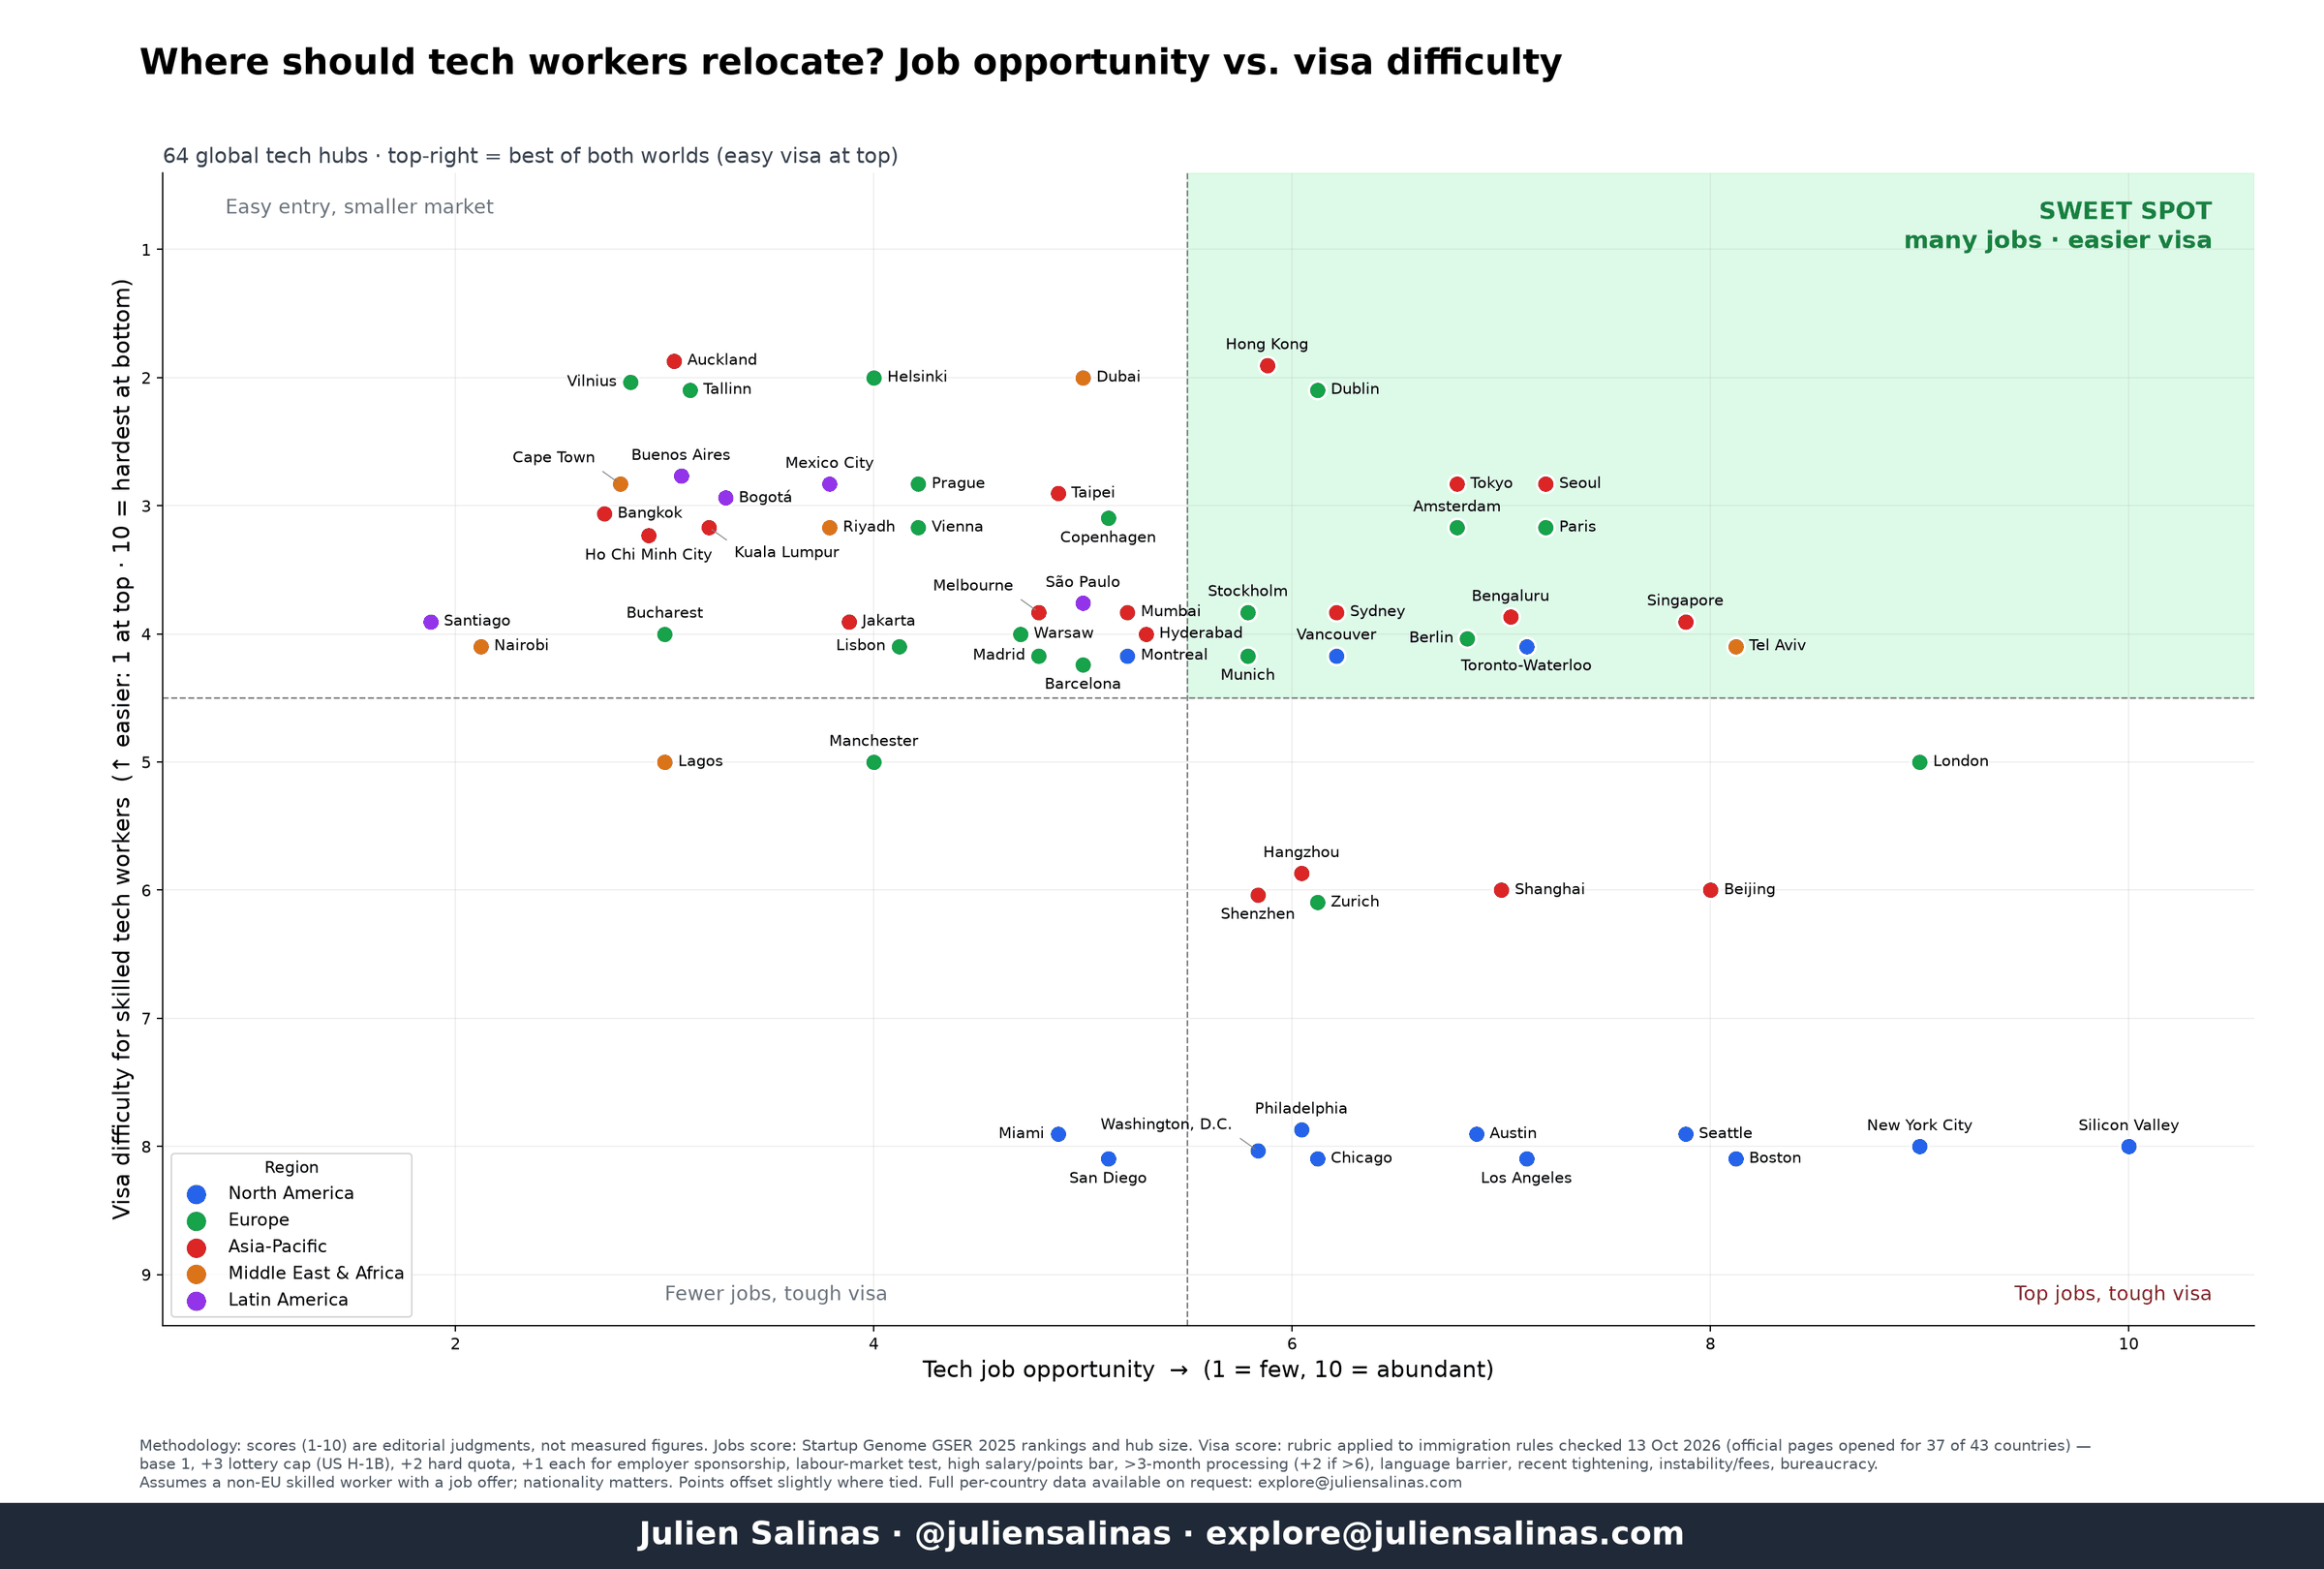
Infographic: 64 tech hubs plotted by tech job opportunity vs. visa difficulty for skilled tech workers

More tech workers are open to moving abroad for work than a few years ago. But “where is the job market good?” and “where can I actually get a visa?” are two different questions. I put both on one chart for 64 tech hubs.

Why this matters

A few data points I checked:

  • In the 2025 CERC/Ipsos Global Mobility Survey of 10,574 workers across 19 countries, “almost half (49%) of employees say they would consider relocating internationally for work; a notable increase compared to 2017, when 46% would consider the same” (Ipsos). The sponsor report frames this as relocation “for up to two years” and lists information technology (58%) as the second most open sector, behind utilities (59%) (CERC/WFPMA sponsor report).
  • The most famous tech visa is also a lottery. For the US H-1B cap in fiscal year 2026, USCIS counted about 339,000 eligible unique beneficiaries and selected 118,660 of them in the initial selection. (USCIS)
  • Rules keep moving. In 2026 alone, Germany raised its EU Blue Card salary thresholds (Make it in Germany), Sweden moved to a 90%-of-median salary requirement (Migrationsverket), Malaysia roughly doubled its Employment Pass salary minimums (ESD Malaysia), and Singapore announced higher Employment Pass salaries from 2027 (MOM). In the US, the $100,000 H-1B payment introduced in 2025 was blocked by the courts in 2026 while the government appeals (USCIS).

So I wanted a single view: where are the jobs, and where is the door actually open?

The findings

The sweet spot (many jobs, easier visa): Amsterdam, Paris, Tokyo, Seoul. All four combine strong tech ecosystems with a clear, employer-sponsored route.

  • Amsterdam: the Netherlands’ highly skilled migrant permit, through an IND-recognised employer.
  • Paris: France’s “Talent” residence card.
  • Tokyo: Japan’s engineer visa and its points-based highly skilled professional track.
  • Seoul: Korea’s E-7 professional visa.

None of them uses a lottery.

Close behind: Singapore, Tel Aviv, Dublin, Hong Kong.

  • Singapore and Tel Aviv score higher on jobs than any city in the top group, but their visas are a bit harder. Singapore has a salary bar plus a points test. Israel has a high minimum salary for foreign experts.
  • Dublin and Hong Kong are among the easiest visas on the chart for a solid job market. Ireland has its Critical Skills permit. Hong Kong’s Top Talent Pass doesn’t even require a job offer.
  • Berlin, Toronto-Waterloo and Bengaluru sit just behind.

The US: the most jobs, the hardest visa. Silicon Valley, New York, Boston and Seattle top the jobs axis. They also sit at the bottom of the visa axis. The H-1B is capped and allocated by lottery, now weighted by wage level. On top of that, policy has been unstable: a $100,000 fee was announced, then blocked by courts, and a separate fee has been proposed.

Other patterns:

  • London has a deep job market. But the UK Skilled Worker route needs a licensed sponsor and a £41,700 minimum salary, which puts it just outside the sweet spot.
  • Zurich and China’s hubs (Beijing, Shanghai, Shenzhen, Hangzhou) are hard. Switzerland has a fixed annual quota for non-EU workers. China uses a points-based permit system with rising salary thresholds.
  • Many smaller hubs are easy to enter but have fewer jobs. Examples are Tallinn, Vilnius, Helsinki, Dubai, Kuala Lumpur and Auckland. They’re worth a look if you already have an offer or work remotely.

Methodology

Tech jobs score (1-10). This is based mainly on the Startup Genome Global Startup Ecosystem Report 2025 ranking. I adjusted it with my judgment of each hub’s size and pay level. Hubs outside that ranking were scored on general market size only.

Visa difficulty score (1-10). Each hub starts at 1 and adds points:

  • +3 for a capped lottery (US H-1B)
  • +2 for a hard national quota, or +1 for a soft or very large quota or an overall cap on temporary workers
  • +1 if employer sponsorship is required
  • +1 for a labour-market test or local-hire/understudy requirement
  • +1 for a salary or points threshold that is high relative to local tech pay
  • +1 if typical processing takes over 3 months (+2 if over 6 months or tied to an annual cycle)
  • +1 each for: a language barrier in most tech jobs, recent tightening, policy instability or high fees or security concerns, heavy bureaucracy

Scores max out at 10. In practice they range from 2 to 8. The chart’s quadrant line sits at 4.5 on visa difficulty and 5.5 on jobs.

Verification. On 13 October 2026, I checked the main skilled-worker route in each of the 43 countries behind the 64 hubs against official immigration pages.

  • 37 countries: I opened and read official pages, fully for 28 and partially for 9.
  • Vietnam: checked against the full text of the relevant decree on a legal database.
  • 5 countries: the official sites could not be fetched (blocked, bot checks or dead links). These are India, Israel, Australia, Finland and Colombia, and their scores rely on secondary sources.

A few inputs are also flagged as secondary-only. Examples include Korea’s E-7 salary floor, Japan’s processing times and Poland’s Blue Card salary. The full per-country data (exact URLs read and inputs that remain unverified) is available on request: DM me or email explore@juliensalinas.com.

Assumptions:

  • The person is a skilled tech worker from outside the EU, with a job offer.
  • Nationality matters a lot. EU citizens move freely within the EU, and bilateral deals exist, so your personal result may differ.
  • Points were nudged slightly apart on the chart when scores tie.

Caveats

  • These are editorial scores, not measurements. The rubric makes my judgment explicit and consistent, but it is still judgment.
  • Rules change fast. Several changed during 2026, and the US fee situation could flip again after appeal. Check the official page before you act.
  • A visa route existing doesn’t mean you’ll get it. Approval depends on your profile, your employer and the specific role.
  • The jobs score leans on startup ecosystems. It under-weights places with large corporate or outsourcing tech employment.
  • Cost of living, salaries after tax, language and quality of life aren’t on this chart. They matter as much as the two axes.

If you spot an error or a rule that changed, tell me and I’ll update the chart.


Julien Salinas · @juliensalinas · explore@juliensalinas.com

API Rate Limiting With Traefik, Docker, Go, and Caching

Limiting API usage based on advanced rate limiting rule is not so easy. In order to achieve this behind the NLP Cloud API, we’re using a combination of Traefik (as a reverse proxy) and local caching within a Go script. When done correctly, you can considerably improve the performance of your rate limiting and properly throttle API requests without sacrificing speed of the requests.

In this example we’re showing how to delegate the rate limiting of every API request to a dedicated microservice thanks to Traefik and Docker. Then in this dedicated microservice, we will count the number of requests recently made in order to authorize or not the new request.

Traefik As A Reverse Proxy

In order to set up an API gateway, Traefik and Docker are a very good combination.

Traefik

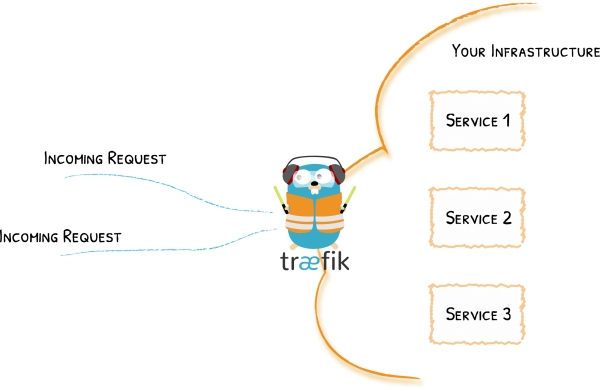
The idea is that all your API requests should be first routed to a Docker container containing a Traefik instance. This Traefik instance acts as a reverse proxy so it will do things like authentication, filtering, retrying, … and eventually routing the user request to the right container.

For example, if you are making a text summarization request on NLP Cloud, you will first go through the API gateway that will take care of authenticating your request and, if successfully authenticated, your request will be routed to a text summarization machine learning model contained in a dedicated Docker container hosted on a specific server.

Both Traefik and Docker are easy to use, and they make your program quite easy to maintain.

Why Use Go?

A rate limiting script will necessarily have to handle a huge volume of concurrent requests.

Go is a good candidate for this type of application as it processes your requests very quickly, and without consuming too much CPU and RAM.

Traefik and Docker were both written in Go, which must not be a coincidence…

A naive implementation would be to use the database to store API usage, count past user requests, and rate limit requests based on that. It will quickly raise performance issues as making a DB request every single time you want to check a request will overwhelm the DB and create tons of unnecessary network accesses. The best solution is to manage that locally in memory. The flip side, of course, it that in-memory counters are not persistent: if you restart your rate limiting application, you will lose all your ongoing counters. It should not be a big deal in theory for a rate limiting application.

Delegating API Rate Limiting To a Dedicated Microservice Thanks To Traefik And Docker

Traefik has many interesting features. One of them is the ability to forward authentication to a dedicated service.

Traefik Auth Forwarding

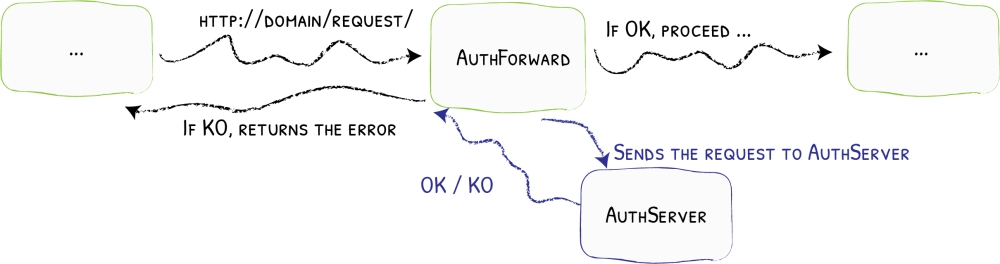
Basically, each incoming API request will first be forwarded to a dedicated service. If this service returns a code 2XX code, then the request is routed to the proper service, otherwise it is rejected.

In the following example, we will use a Docker Compose file for a Docker Swarm cluster. If you’re using another container orchestrator like Kubernetes, Traefik will work very well too.

First, create a Docker Compose file for your API endpoint and enable Traefik:

version: "3.8"

services:
  traefik:
    image: "traefik"
    command:
      - --providers.docker.swarmmode
  api_endpoint:
    image: path_to_api_endpoint_image
    deploy:
      labels:
        - traefik.http.routers.api_endpoint.entrypoints=http
        - traefik.http.services.api_endpoint.loadbalancer.server.port=80
        - traefik.http.routers.api_endpoint.rule=Host(`example.com`) && PathPrefix(`/api-endpoint`)

Then add a new service dedicated to rate limiting and ask Traefik to forward all requests to it (we will code this Go rate limiting service a bit later):

version: "3.8"

services:
  traefik:
    image: traefik
    command:
      - --providers.docker.swarmmode
  api_endpoint:
    image: path_to_your_api_endpoint_image
    deploy:
      labels:
        - traefik.http.routers.api_endpoint.entrypoints=http
        - traefik.http.services.api_endpoint.loadbalancer.server.port=80
        - traefik.http.routers.api_endpoint.rule=Host(`example.com`) && PathPrefix(`/api-endpoint`)
        - traefik.http.middlewares.forward_auth_api_endpoint.forwardauth.address=http://rate_limiting:8080
        - traefik.http.routers.api_endpoint.middlewares=forward_auth_api_endpoint
  rate_limiting:
    image: path_to_your_rate_limiting_image
    deploy:
      labels:
        - traefik.http.routers.rate_limiting.entrypoints=http
        - traefik.http.services.rate_limiting.loadbalancer.server.port=8080

We now have a full Docker Swarm + Traefik configuration that first forwards requests to a rate limiting service before eventually routing the request to the final API endpoint. You can put the above in a production.yml file and start the application with the following command:

docker stack deploy --with-registry-auth -c production.yml application_name

Note that only the headers of the requests are forwarded, not the content of the requests. This is for performance reasons. So if you want to authenticate a request based on the body of this request, you will need to come up with another strategy.

Handling Rate Limiting With Go And Caching

The Traefik and Docker configurations are ready. We now need to code the Go microservice that will take care of rate limiting the requests: users only have the right to 10 requests per minute. Above 10 requests per minute, every request will be rejected with a 429 HTTP code.

package main

import (
  "fmt"
  "time"
  "log"
  "net/http"

  "github.com/gorilla/mux"
  "github.com/patrickmn/go-cache"
)

var c *cache.Cache

// updateUsage increments the API calls in local cache.
func updateUsage(token) {
  // We first try to increment the counter for this user.
  // If there is no existing counter, an error is returned, and in that
  // case we create a new counter with a 3 minute expiry (we don't want
  // old counters to stay in memory forever).
  _, err := c.IncrementInt(fmt.Sprintf("%v/%v", token, time.Now().Minute()), 1)
  if err != nil {
  c.Set(fmt.Sprintf("%v/%v", token, time.Now().Minute()), 1, 3*time.Minute)
  }
}

func RateLimitingHandler(w http.ResponseWriter, r *http.Request) {
  // Retrieve user API token from request headers.
  // Not implemented here for the sake of simplicity.
  apiToken := retrieveAPIToken(r)
  
  var count int

  if x, found := c.Get(fmt.Sprintf("%v/%v", apiToken, time.Now().Minute())); found {
    count = x.(int)
  }

  if count >= 10 {
    w.WriteHeader(http.StatusTooManyRequests)
    return
  }

  updateUsage(apiToken)

  w.WriteHeader(http.StatusOK)
}

func main() {
 r := mux.NewRouter()
 r.HandleFunc("/", RateLimitingHandler)

 log.Println("API is ready and listening on 8080.")

 log.Fatal(http.ListenAndServe(":8080", r))
}

As you can see, we’re using the Gorilla toolkit in order to create a small API, listening on port 8080, that will receive the request forwarded by Traefik.

Once the request is received, we extract the user API token from the request (not implemented here for the sake of simplicity), and check the number of requests made by the user associated with this API token during the last minute.

The request counter is stored in memory thanks to the go-cache library. Go-cache is a minimalist caching library for Go that is very similar to Redis. It automatically handles important things like cache expiry. Storing the API counters in memory is crucial as it is the fastest solution, and we want this code to be as fast as possible in order not to slow down API requests too much.

If the user has made more than 10 requests during the current minute, the request is rejected with a 429 HTTP error code. Traefik will see that this 429 error is not a 2XX code, so it won’t allow the user request to reach the API endpoint, and it will propagate the 429 error to the user.

If the request is not rate limited, we automatically increment the counter for this user.

I recommend that you deploy this Go application within a simple “scratch” container (FROM scratch): it is the lightest way to deploy Go binaries with Docker.

Conclusion

As you can see, implementing a rate limiting gateway for your API is not that hard, thanks to Traefik, Docker and Go.

Of course, rate limiting based on a number of requests per minute is only a first step. You might want to do more advanced things like:

  • Rate limiting per minute, per hour, per day, and per month
  • Rate limiting per API endpoint
  • Have a variable rate limit per user depending on the plan he subscribed to
  • Check concurrency

So many interesting things we can’t mention in this article!

If you have questions please don’t hesitate to reach out to me.

Existe aussi en français | También existe en Español
API Analytics With Time-Series Thanks to TimescaleDB

Tracking API usage can be quite a technical challenge due to the high speed and volume of requests. Yet, having accurate analytics for your API is crucial, especially if you rely on that to invoice your customers. It is possible to be both fast and accurate with a time-series database called TimescaleDB. This is actually the solution we implemented behind NLP Cloud.

What Is API Analytics And Why Is It Hard?

API analytics is about retrieving various metrics related to the usage of your API.

For example, behind the NLP Cloud API we want to know the following things:

  • How many requests were made during the last minute, the last hour, the last day, the last month, and the last year
  • How many requests were made per API endpoint, and per user
  • How many words were generated by our text generation NLP models (like GPT-J)
  • How many characters were used by our multilingual NLP add-on

All these metrics are important in order to better understand how our API is used by our customers. Without such data, we’re unable to know which NLP models are the most used, who are our more important customers, etc.

But even more importantly, some of these metrics are used for invoicing! For example, customers who subscribed to a “pay-as-you-go” plan, are charged based on the number of words they generated with our API.

A very high volume of data is going through our API gateway, which is a challenge in terms of performance. It is very easy to either slow down the API, or lose some data.

So this is crucial that such an API analytics system is both fast and reliable.

TimescaleDB To The Rescue

TimescaleDB is a PostgreSQL database that has been optimized for time-series.

TimescaleDB

Basically, Timescale is optimized for a high volume of atomic writes. It is perfect for a use case where you write tons of data on a very regular basis, but almost never alter this data, and only read the data occasionally.

Timescale comes with interesting tools that make time-series easier. For example, they have so-called “continuous aggregates”. Such aggregates are a way to automatically “down-sample” your data on a regular basis. Down-sampling means that you remove old data after some time, and only keep some aggregates of this data (based on sums, counts, averages, etc.). It it crucial for 2 reasons:

  • Time-series can grow very quickly, so it is a very good way to save some disk space
  • Reading from a table stuffed with data can be painfully slow. It is much easier to read the data from an aggregated table that contains less data.

As opposed to other solutions like InfluxDB, TimescaleDB is a pure SQL solution, so the learning curve is quite low, and it will make the integration much easier. For example at NLP Cloud we’re interfacing with TimescaleDB in both Python and Go applications and we’re able to use our usual PostgreSQL libraries.

Installation

You can install TimescaleDB as a system package, but it’s simpler to install it as a Docker container.

First pull the Docker image:

docker pull timescale/timescaledb:latest-pg14

Then start your container and pass a password for your DB:

docker run -d --name timescaledb -p 5432:5432 -e POSTGRES_PASSWORD=password timescale/timescaledb:latest-pg14

Data Structure In TimescaleDB

In this example, we want to store API requests. We want each request to contain the following:

  • The time of the request
  • The id of the user who made the request
  • The API endpoint used during the request

The first time your launch TimescaleDB, you will need to create several things.

First init the TimescaleDB extension.

CREATE EXTENSION IF NOT EXISTS timescaledb;

Create the table that will store API requests, like we would do in any PostgreSQL DB:

CREATE TABLE IF NOT EXISTS api_calls (
  time TIMESTAMPTZ NOT NULL,
  user_id TEXT NOT NULL,
  endpoint TEXT NOT NULL
);

Then we create a so-called “hypertable” out of it:

SELECT create_hypertable('api_calls', 'time', if_not_exists => TRUE);

Hypertables are the heart of TimescaleDB. They automatically add many smart things in order to manage your data efficiently.

We now create a specific view out of your api_calls table called api_calls_per_hour. It is a view that will store aggregated data coming from api_calls. Every hour, the number of API requests in api_calls will be counted and put in api_calls_per_hour. The view will be much faster to query since it contains much less data than the initial api_calls table.

CREATE MATERIALIZED VIEW IF NOT EXISTS api_calls_per_hour
WITH (timescaledb.continuous) AS
SELECT time_bucket('1 hour', time) as bucket, user_id, endpoint,
COUNT(time)
FROM api_calls
GROUP BY bucket, user_id, endpoint;

Last of all, we create a continuous aggregate policy and a retention policy. Both will be managed by background workers. Most of the time everything works fine, but it you start having a lot of policies you might run out of background workers and you will see some error messages in your logs. In that case, the trick is to increase your number of background workers in /var/lib/postgresql/data/postgresql.conf.

The continuous aggregate policy will take care of regularly down-sampling the data from api_calls and putting it in api_calls_per_hour. The retention policy will take care of deleting old data from api_calls so you will never run out of disk space:

SELECT add_continuous_aggregate_policy('api_calls_per_hour',
  start_offset => INTERVAL '1 day',
  end_offset => INTERVAL '1 hour',
  schedule_interval => INTERVAL '1 minute',
  if_not_exists => TRUE);

SELECT add_retention_policy('api_calls', INTERVAL '90 days', if_not_exists => TRUE);

As you can see it was not too complex.

Inserting Data

In your application, you can now connect to your Timescale DB and insert requests.

For example, here is how you would do it in Python:

import psycopg2

conn = psycopg2.connect(
  "host=timescaledb dbname={} user={} password={}".format("name", "user", "password"))
cur = conn.cursor()
cur.execute("INSERT INTO api_calls (time, user_id, endpoint) VALUES (%s, %s, %s)",
  (datetime.now(), "1584586", "/v1/gpu/bart-large-cnn/summarization"))
conn.commit()
cur.close()
conn.close()

And now in Go:

import (
  "github.com/jackc/pgx/v4"
  "github.com/jackc/pgx/v4/pgxpool"
)

func main(){
timescaledbURL := fmt.Sprintf("postgres://%s:%s@timescaledb:5432/%s", "user", "password", "name")
timescaledbDatabase, err := pgxpool.Connect(context.Background(), timescaledbURL)
if err != nil {
  log.Fatalf("Cannot connect to TimescaleDB database: %v. Stopping here.", err)
}

query := `INSERT into api_calls (time, user_id, endpoint) VALUES ($1, $2, $3)`
ctx, cancel := context.WithTimeout(context.Background(), 5*time.Second)
  defer cancel()

  _, err := timescaledbDatabase.Exec(ctx, query, time.Now(), "1584586", "/v1/gpu/bart-large-cnn/summarization")
  if err != nil {
    log.Printf("Cannot insert metric in TimescaleDB: %v", err)
  }
}

Important point: you most likely don’t want to slow down user API requests because of potentially slow processing on the TimescaleDB side. The solution is to insert your data asynchronously, so the user API response returns even if the data is not inserted in your DB yet. But this is beyond the scope of this article.

In order to improve the throughput, you can also insert several API requests all at once. The idea is that you would first need to cache some requests in memory, and then save many of them in DB at once after some time.

Data Visualization

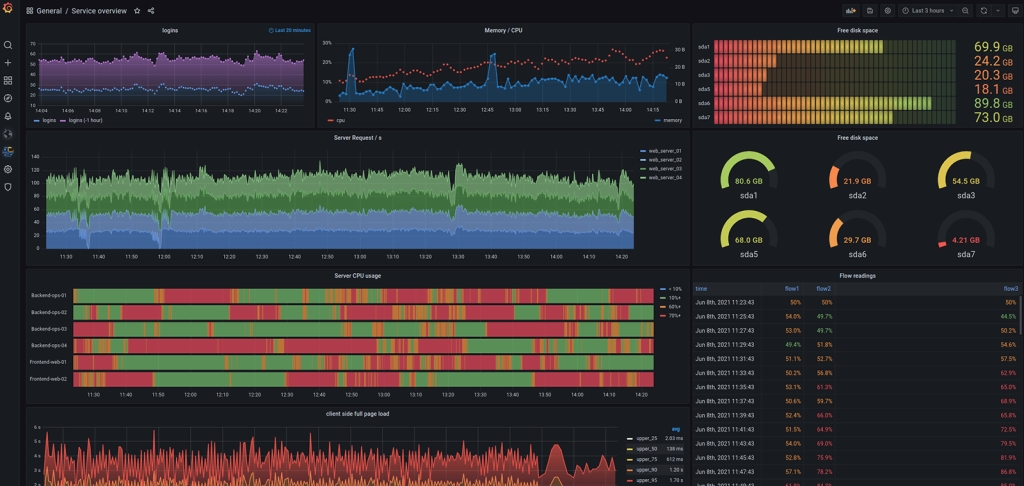
Many data visualization tools exist. I like Grafana because it is easy to plug it into TimescaleDB, and the chart capabilities are countless.

Here is a nice tutorial about how to set up TimescaleDB with Grafana: see it here.

Grafana

Conclusion

TimescaleDB is a powerful tool for time-series, and this is a great solution if you want to properly analyze your API usage.

As you can see, setting up and using TimescaleDB is quite easy. Careful though: TimescaleDB can quickly use a lot of RAM, so make sure to keep that in mind before provisioning your server instance.

If you have questions please don’t hesitate to ask!

Existe aussi en français | También existe en Español
Storing Stripe Payment Data in the Database

It’s hard to know whether Stripe payment data should be stored in the local database or not. Many developers are wondering which kind of Stripe data they should save in their local DB. They might sometimes even be tempted not to store any data locally and only rely on Stripe API calls.

Let me show you how we’re dealing with this problem at NLP Cloud, and why.

NLP Cloud is a Natural Language Processing API based on spaCy and HuggingFace transformers in order to propose Named Entity Recognition (NER), sentiment analysis, text classification, summarization, text generation, and much more. Customers are charged monthly and their payment is processed by Stripe. It is important to us that the API and the user dashboard are lightning fast, so we want to rely on the Stripe API the less we can. We also don’t want to depend too much on Stripe in case of a data loss on their end.

Typical Scenario

Here is a standard scenario for a subscription based service like we have at NLP Cloud:

  1. A customer registers to your website
  2. You save the customer in DB
  3. You create the customer in Stripe through the Stripe API
  4. You save the Stripe customer ID in the local DB

You cannot really do better than this.

Now the fun begins.

For example you might want to keep track of your customer’s subscription in order to grant him access to some paid features, to more API requests, or, if he’s a free user, disable some features (for example). Sometimes, you are going to update a subscription by yourself, but sometimes Stripe will (for example if a payment fails multiple times, Stripe will mark the subscription as canceled). When a subscription is updated by Stripe, they will let you know through a webhook call. If you are using Stripe Portal, everything is going to be handled on the Stripe end, and any change is going to be sent to you through webhooks.

So dealing with Stripe is a bidirectional thing: sometimes you initiate a change, sometimes they do. It is easy to get out of sync!

Speed Considerations

One might be tempted to delegate as much information as possible to Stripe so Stripe is the single source of truth. In such a situation, you would need to make a call to the Stripe API very often. This is a bad idea.

For example, if your customer subscription data is in Stripe only, you will first need to call Stripe before allowing a customer to access or not a specific paid feature. It adds critical milliseconds to your website’s response time, which is not good. And if Stripe is temporarily lagging, your website is lagging too. In case of an API, this is out of the question: you cannot slow down an API call because you’re waiting for Stripe to return.

Disaster Recovery Considerations

Delegating information to Stripe without local data is risky. Even if Stripe is a solid player, you can never be sure that they’re not going to lose your data.

From a safety standpoint, it is paramount to store the customers’ data locally so you can start again you service somewhere else in case of a disaster, without losing any customer subscription (which would be terrible).

Caching Everything Locally

The strategy we follow at NLP Cloud is to cache everything related to Stripe customers and Stripe subscription locally. It is simpler than it might sound thanks to the fact that modern databases like PostgreSQL can store JSON data seamlessly with almost no performance tradeoffs.

Basically, what you should do - if you want to follow this strategy - is the following:

  1. When you create a Stripe customer with their API, save the Stripe JSON response in a JSON DB field (with PostgreSQL, use the JSONB type)
  2. When you create a Stripe subscription for this customer, do the same
  3. Whenever you need to access Stripe customer or subscription information, just query the customer or the subscription DB fields

Here is an example of data INSERT in a PostgreSQL JSONB field:

CREATE TABLE customers (  
  id serial NOT NULL,
  stripe_customer jsonb
  stripe_subscription jsonb
);
INSERT INTO customers VALUES (1, '{id:1, ...}', '{id:1, ...}');

And here is how you could retrieve the Stripe subscription id for example:

SELECT stripe_subscription->'id' AS id FROM customers;  

2 fields in the DB and that’s it! No need to create a bunch of new fields for every customer fields and subscription fields.

Staying in Sync

In order to make sure that your local cache is perfectly in sync with Stripe you should properly listen to Stripe webhooks.

Every time you get a Stripe webhook about a customer or a subscription, update the customer field or the subscription field in DB.

If you really want to be safe, you should also be prepared for potential Stripe webhooks failures. In that case, the best strategy would be to proactively poll Stripe customers and subscription on a regular basis, in order to make sure you never end up out of sync.

Conclusion

As you can see, it is quite easy to create both a simple and robust Stripe local cache. This strategy saves a lot of development time, it is fast, safe in case of Stripe failure, and you no longer have to wonder which Stripe fields you need to store locally or not.

I hope you found this useful. If you have feedbacks, or if you think of a better strategy, please let me know!

Existe aussi en français
Production-Ready Machine Learning NLP API with FastAPI and spaCy

FastAPI is a new Python API framework that is more and more used in production today. We are using FastAPI under the hood behind NLP Cloud. NLP Cloud is an API based on spaCy and HuggingFace transformers in order to propose Named Entity Recognition (NER), sentiment analysis, text classification, summarization, and much more. FastAPI helped us quickly build a fast and robust machine learning API serving NLP models.

Let me tell you why we made such a choice, and show you how to implement an API based on FastAPI and spaCy for Named Entity Recognition (NER).

Why FastAPI?

Until recently, I’ve always used Django Rest Framework for Python APIs. But FastAPI is proposing several interesting features:

  • It is very fast
  • It is well documented
  • It is easy to use
  • It automatically generates API schemas for you (like OpenAPI)
  • It uses type validation with Pydantic under the hood. For a Go developer like myself who is used to static typing, it’s very cool to able to leverage type hints like this. It makes the code clearer, and less error-prone.

FastAPI’s performances are supposed to make it a great candidate for machine learning APIs. Given that we’re serving a lot of demanding NLP models based on spaCy and transformers at NLP Cloud, FastAPI is a great solution.

Set Up FastAPI

The first option you have is to install FastAPI and Uvicorn (the ASGI server in front of FastAPI) by yourself:

pip install fastapi[all]

As you can see, FastAPI is running behind an ASGI server, which means it can natively work with asynchronous Python requests with asyncio.

Then you can run your app with something like this:

uvicorn main:app

Another option is to use one the Docker images generously provided by Sebastián Ramírez, the creator of FastAPI. These images are maintained and work out of the box.

For example the Uvicorn + Gunicorn + FastAPI image adds Gunicorn to the stack in order to handle parallel processes. Basically Uvicorn handles multiple parallel requests within one single Python process, and Gunicorn handles multiple parallel Python processes.

The application is supposed to automatically start with docker run if you properly follow the image documentation.

These images are customizable. For example, you can tweak the number of parallel processes created by Gunicorn. It’s important to play with such parameters depending on the resources demanded by your API. If your API is serving a machine learning model that takes several GBs of memory, you might want to decrease Gunicorn’s default concurrency, otherwise your application will quickly consume too much memory.

Simple FastAPI + spaCy API for NER

Let’s say you want to create an API endpoint that is doing Named Entity Recognition (NER) with spaCy. Basically, NER is about extracting entities like name, company, job title… from a sentence. More details about NER here if needed.

This endpoint will take a sentence as an input, and will return a list of entities. Each entity is made up of the position of the first character of the entity, the last position of the entity, the type of the entity, and the text of the entity itself.

The endpoint will be queried with POST requests this way:

curl "http://127.0.0.1/entities" \
  -X POST \
  -d '{"text":"John Doe is a Go Developer at Google"}'

And it will return something like this:

[
  {
    "end": 8,
    "start": 0,
    "text": "John Doe",
    "type": "PERSON"
  },
  {
    "end": 25,
    "start": 13,
    "text": "Go Developer",
    "type": "POSITION"
  },
  {
    "end": 35,
    "start": 30,
    "text": "Google",
    "type": "ORG"
  },
]

Here is how we could do it:

import spacy
from fastapi import FastAPI
from pydantic import BaseModel
from typing import List

en_core_web_lg = spacy.load("en_core_web_lg")

api = FastAPI()

class Input(BaseModel):
    sentence: str

class Extraction(BaseModel):
    first_index: int
    last_index: int
    name: str
    content: str

class Output(BaseModel):
    extractions: List[Extraction]

@api.post("/extractions", response_model=Output)
def extractions(input: Input):
    document = en_core_web_lg(input.sentence)

    extractions = []
    for entity in document.ents:
      extraction = {}
      extraction["first_index"] = entity.start_char
      extraction["last_index"] = entity.end_char
      extraction["name"] = entity.label_
      extraction["content"] = entity.text
      extractions.append(extraction)

    return {"extractions": extractions}

The first important thing here is that we’re loading the spaCy model. For our example we’re using a large spaCy pre-trained model for the english language. Large models take more memory and more disk space, but give a better accuracy as they were trained on bigger datasets.

en_core_web_lg = spacy.load("en_core_web_lg")

Later, we are using this spaCy model for NER by doing the following:

document = en_core_web_lg(input.sentence)
# [...]
document.ents

The second thing, which is an amazing feature of FastAPI, is the ability to force data validation with Pydantic. Basically, you need to declare in advance which will be the format of your user input, and the format of the API response. If you’re a Go developer, you’ll find it very similar to JSON unmarshalling with structs. For example, we are declaring the format of a returned entity this way:

class Extraction(BaseModel):
    first_index: int
    last_index: int
    name: str
    content: str

Note that start and end are positions in the sentence, so they are integers, and type and text are strings. If the API is trying to return an entity that does not implement this format (for example if start is not an integer), FastAPI will raise an error.

As you can see, it is possible to embed a validation class into another one. Here we are returning a list of entities, so we need to declare the following:

class Output(BaseModel):
    extractions: List[Extraction]

Some simple types like int and str are built-in, but more complex types like List need to be explicitly imported.

For brevity reasons, the response validation can be implemented within a decorator:

@api.post("/extractions", response_model=Output)

More Advanced Data Validation

You can do many more advanced validation things with FastAPI and Pydantic. For example, if you need the user input to have a minimum length of 10 characters, you can do the following:

from pydantic import BaseModel, constr

class Input(BaseModel):
    sentence: constr(min_length=10)

Now, what if Pydantic validation passes, but you later realize that there’s something wrong with the data so you want to return an HTTP 400 code?

Simply raise an HTTPException:

from fastapi import HTTPException

raise HTTPException(
            status_code=400, detail="Your request is malformed")

It’s just a couple of examples, you can do much more! Just have a look at the FastAPI and Pydantic docs.

Root Path

It’s very common to run such APIs behind a reverse proxy. For example we’re using the Traefik reverse proxy behind NLPCloud.io.

A tricky thing when running behind a reverse proxy is that your sub-application (here the API) does not necessarily know about the whole URL path. And actually that’s great because it shows that your API is loosely coupled to the rest of your application.

For example here we want our API to believe that the endpoint URL is /entities, but actually the real URL might be something like /api/v1/entities. Here’s how to do it by setting a root path:

api = FastAPI(root_path="/api/v1")

You can also achieve it by passing an extra parameter to Uvicorn in case you’re starting Uvicorn manually:

uvicorn main:app --root-path /api/v1

Conclusion

As you can see, creating an API with FastAPI is dead simple, and the validation with Pydantic makes the code very expressive (and then needs less documentation in return) and less error-prone.

FastAPI comes with great performances and the possibility to use asynchronous requests out of the box with asyncio, which is great for demanding machine learning models. The example above about Named Entity Extraction with spaCy and FastAPI can almost be considered as production-ready (of course the API code is only a small part of a full clustered application). So far, FastAPI has never been the bottleneck in our NLPCloud.io infrastructure.

If you have any question, please don’t hesitate to ask!

Existe aussi en français